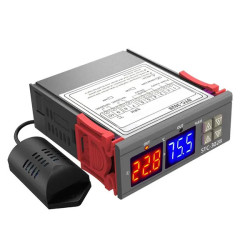
with buzzer and NTC probe")
 with buzzer and NTC probe")

Security policy

Delivery policy
This thermometer consists of activating a relay when it reaches the set temperature. When this temperature is reached, the relay will activate and will remain so until the temperature drops as configured.
Characteristics:
- Input voltage: DC12V (source not included)
- Temperature Measurement Range: -50ºC ~ 110ºC
- Accuracy: 0.1ºC
- Update Range: 0.5 sec
- Type NTC sensor (10K 0.5%) waterproof
- Sensor cable length: 30cm
- Output: NO Relay Contact = 5A up to 220VAC / 20A up to 16VDC
- Size: 48 mm x 29 mm x 32 mm
- Installation Measurements: 46 mm x 26.5 mm
- High temperature protection: 0 ~ 110 °C
- Measuring sensor: NTC (10 k 0.5%) waterproof type sensor
- Environmental requirements: -10 °C ~ 60 °C Humidity: 20% ~ 85%
Settings:
- P0: C – H … Cold / Hot ……….. (C)
- P1: 0.1 ~ 30 °C … Hysteresis………….. (2.0)
- P2: -45 ~ 110 °C …. Upper Limit…. (110)
- P3: -50 ~ 105 °C … Lower Limit …… (-50)
- P4: -10 ~ 10 °C …. Calibration ……….. (0.0)
- P5: 0 ~ 10 min. ….. Delay ……………… (00)
- P6: OFF/ON: -50~110°C. ..Alarm…(OFF)
- P7: CS / FH .. Celsius/Fahrenheit .. (CS)
- P8: ON / OFF ……Reset ………………….(OFF).
- SETpoint: The relay is opened when the temperature reaches the value programmed in the SETpoint.
- And closes in: “SETpoint – P1” (difference between the SETpoint and the Hysteresis configured in P1).
- P6: The value allowed in P6 depends on the SETpoint. Eg: if you want to set an alarm at 40°C during heating, the SETpoint must obviously be < 40°C.
- RESET: Activate parameter P8 to restore factory values.
Configuration Mode:
- 1 – SETpoint.1.1 – Press the SET button once (the blue display starts blinking);
- 1.2 – Press the °C/°F or SET button to set the desired value. Each touch increments/decrements 0.1 (1 tenth). Keeping pressed increments/decreases rapidly;
- 1.3 – Wait a moment until the configuration is confirmed (the display stops flashing in ~4 seconds). NOTE: The SETpoint is conditioned by the limits of P2 and P3. Therefore, configure these parameters according to your project for safety reasons during operation, as well as parameter P6 according to project demand.
- 2 – MENU (P0 … P8)
- 2.1 – Press SET for 3 seconds;
- 2.2 – Press SET or °C/°F to scroll through the parameters ( P0 …. P8 );
- 2.3 – After choosing the parameter to be configured, press SET and °C/°F -simultaneously (the blue display starts flashing);
- 2.4 – Repeat steps 1.2 and 1.3 of item “SETpoint”.
Data sheet